Thursday, September 27, 2018

Vogue 2442 -- Vintage Calvin Klein Jeans


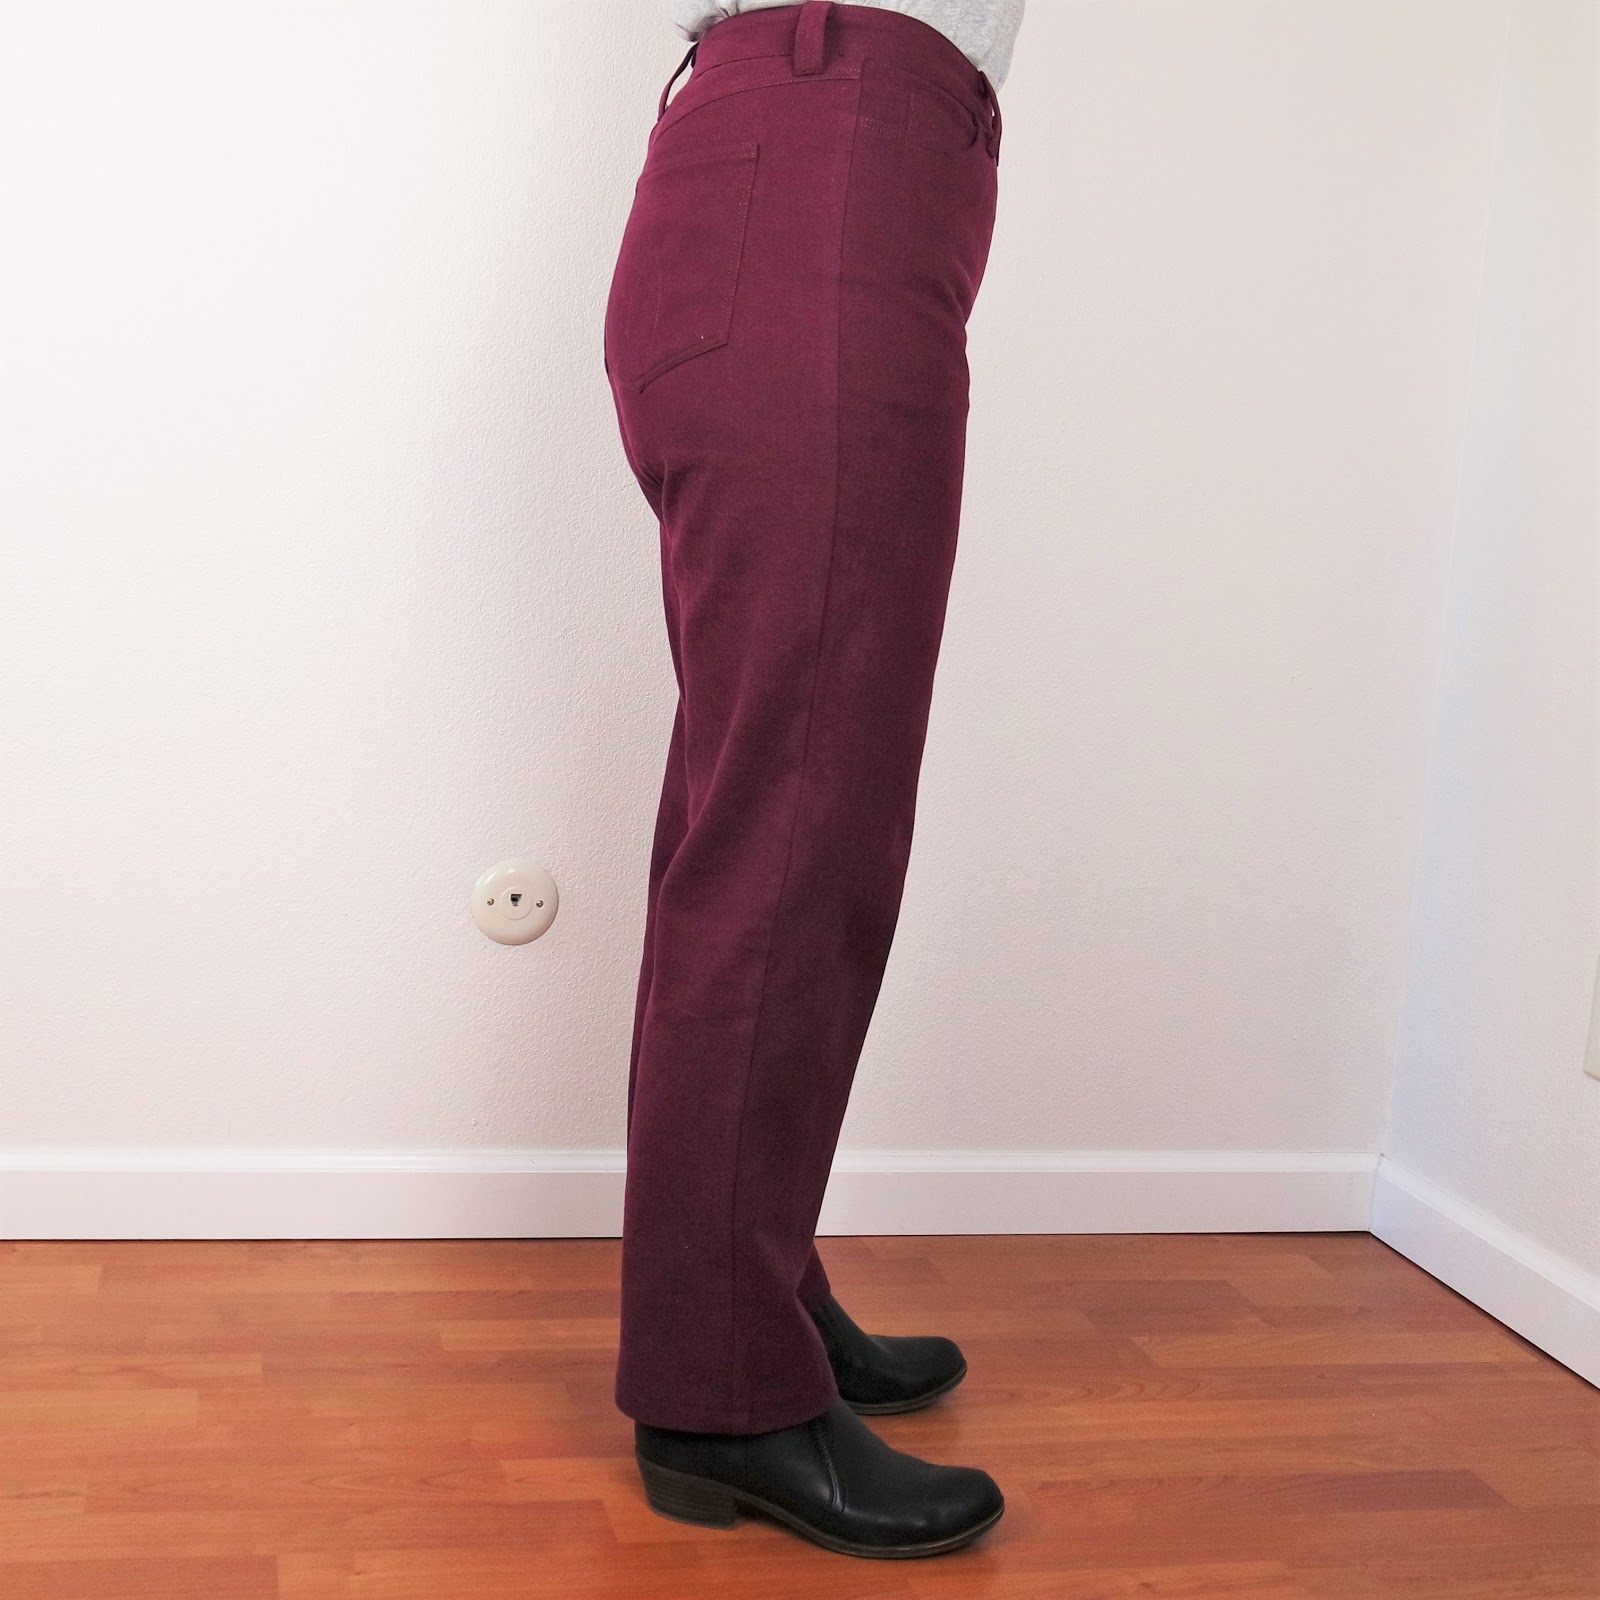
Nope, haven't perfected the fit yet!

I've been working on these jeans on and off for too many weeks... with a couple vacations in between... and they are finally done! Before I get to all the details, I'll just say that if you can find this pattern in a thrift store or on Etsy, eBay, etc., and if you're a jeans-making or pattern-drafting nerd like me, it's worth buying.


Fabric Selection
I've made a lot of jeans and currently have about 6 pairs of me-made jeans in various stages of wearability and honestly I didn't need another pair. I decided to shake things up this time with colored denim. Ha, yes, I'm so daring! Anyway, I thought it would give me a little bit dressier option than regular blue denim jeans.

This pattern pre-dates widely available stretch denim so I wanted to make it in non-stretch fabric. Ultimately I decided on wine-colored bull denim from fabric.com.  Bull denim is thick like regular denim, sometimes even thicker, but it's not quite as stiff so it can be easier to sew and more comfortable to wear. The only drawback to the denim I found -- it was intended for home dec use and was labeled dry clean only.

Not one to religiously follow care instructions, I bought the fabric anyway and decided to see what would happen if I washed it. It's 100% cotton so what could go wrong?

There are two things I always (ok, usually) test for before I sew up a fabric, crocking and bleeding. Crocking is when the dye rubs off when the fabric is dry. Washing the fabric may or may not stop the crocking. I've had some denim that crocks so badly I can't sit on light colored furniture, even after several washes. I think it's actually fairly common in darker blue denims (or maybe I tend to buy poor-quality denim) and I'm ok with a small degree of crocking, but if it turns my hands, my sewing machine, or the inside of my dryer an obvious color then I don't want to work with it or wear it because if I do I'll eventually end up with permanent dye someplace I didn't want it. I check for this by rubbing a scrap of light cloth fairly hard on an edge of the fabric. (Not the middle in case it removes dye and leaves a light spot.) This dark wine-colored denim didn't crock at all! Yay! I thought I was home free!

I washed the fabric once by itself in hot water to get as much shrinkage and excess dye out of the way as possible. I dried it on hot, again to encourage shrinkage, then I repeated the whole process. I hate to waste so much hot water and electricity on pretreating fabric, but better that than a surprise shrinkage after I've put hours into a project (been there, done that). Then I washed it a 3rd time with a load of dark towels and one white washcloth. The dark brown towels weren't affected, the medium blue towel came out of the laundry with a distinct periwinkle cast, and the white washcloth was VERY pink. Obviously this fabric has a bleeding problem, which is when the dye transfers to another fabric when the fabric is wet. I would mostly be washing these jeans with other dark colors, but what about my husband's navy shirts with small white logos? I really can't have those turning pink!

Lucky I happened to have some Retayne dye fixative on hand. I think RIT makes a fixative as well. The treatment involved hand agitating the fabric and fixative in a large bucket of hot water for 30 minutes (not fun!) but one more wash with another white washcloth showed only the slightest amount of bleeding. As long as I'm careful with the laundry I shouldn't have any more problems.

The Pattern
I've seen a few blog posts by other people who made this pattern and it seemed to run a little big. It's pretty typical for Vogue patterns to have a lot of ease so I thought the size 12 should fit me perfectly even though my measurements put me in a 14. It was close, a 14 might have been too big, but I was VERY glad I added extra wide seam allowances on the side seams.

The pattern has a couple quirks, namely the position of the inseam and side seam. Compared to other jeans patterns I have, and to RTW jeans, these seams on this pattern sit farther back. I don't know if that was typical in 80's jeans, but I decided to move them to make them more like what I'm used to. On the jeans front piece I moved the inseam stitching line in by 1/2".  On the back piece I moved the inseam out by 1/2" and added 1" in width to the entire length of the piece, as well as to the back yoke. This gave me extra seam allowance to work with on the sides.

Besides that it's a pretty good pattern, better than any other I've made. The back yoke has no dart shaping which I thought was strange, but it works incredibly well on me. The notches are all numbered in order of assembly. Do Vogue patterns still do that? I forgot it was a thing, and I love it. The best feature may be the pocket stay. The innermost pocket piece extends into the fly at center front, which gives a flatter-looking front...

Front Pocket Stay

Also, the jeans front piece is 1/4" wider than the stay, meaning there is more fabric in the outer layer to make a smooth curve around the body, AND it gives a tiny bit of ease in the pocket opening so you can actually uses your pockets! I've seen directions for this, and I've included it in my own self-drafted jeans, but I've never seen it in another pattern. Not that I've used a lot of jeans patterns, but feel free to recommend any that do this because to me it's a mark of a well-drafted pattern.


The pattern has a contoured waistband, which I didn't use because it was VERY curved. I may actually have a 4" difference between my waist and 1.5" below my waist, but I don't want to emphasize it. Instead I cut a straight waistband, stabilized the upper edge with narrow twill tape, and stretched/steamed the lower edge of the waistband into a curve.


The fly instructions are really good. I don't think a jeans fly is hard, the main difference is in the quality of instructions. These instructions don't even mention a serger (hello 1980!) which I think is great, because jeans-making shouldn't be limited to serger owners.


And the best/worst part of the pattern -- the stitching guide for Calvin Klein's back pocket design. Is it right for me to put the Calvin Klein stitching on jeans I made? It kind of feels like I'm being dishonest. But then is it right to use Calvin Klein's pattern and put my own stitching on the pockets? That doesn't feel right either. I did the CK stitch pattern in matching thread so it's not too obvious. I'll have to see how I feel after I wear them a few times.


A final quick summary of this pattern:

Pros:

  • Pocket stay
  • Roomy front pockets
  • Great fly instructions
  • Calvin Klein back pocket stitch design
  • Looks nearly identical to high-waist, straight-leg jeans currently on Calvin Klein website
Cons:
  • Overly contoured waistband
  • Inseam and side seams are set too far back
  • Front and back inseam are the same length, leaving too much length in back thigh
Would I make these again?  Umm, probably not. The fit still needs a lot of work for me, and the style seems a little frumpy on my short legs. But I'll use some of the features I like in my self-drafted jeans pattern just because it already fits me, and I'll keep trying to create the perfect pair of jeans!


Thursday, August 16, 2018

Down the Jeans Fitting Rabbit Hole

Maybe this post should be called "That time I spent a week tracing patterns and didn't actually make jeans."  Regardless, it's been a fun journey, one that's kept me awake at night for the past week, and I think it's been worthwhile.

It all started because I found this pattern at a used pattern sale:


I remember seeing this in the pattern catalogs when I was a teenager. I couldn't afford a real pair of Calvin Klein jeans and I wouldn't have been caught dead in a homemade pair. Name brand jeans were a big thing in the 80's. Now that I'm well past that time in my life I've made quite a few pairs of jeans. Nobody has ever asked what brand they are, so I guess they don't care. (And even if they did, I don't.) I don't feel any need to own vintage designer jeans, but I'm curious about the quality of this pattern and let's face it, I have a place in my heart for all things 80's.

But here's the thing. Most of my me-made jeans are from a self-drafted pattern which I've been slowly perfecting over the past few years. I've bought jeans patterns but then I decide I should stick with the pattern that works instead of starting from scratch. There have been a few exceptions, and I'm going to compare them in this post to see what I can learn from their similarities and differences. The patterns I've purchased and sewn are:

1.  Chi-town Chinos by Alina Design Co. which are not jeans, but I made the fitted knee-length shorts so the fit is similar to jeans.
2.  Morgan Boyfriend Jeans by Closet Case Patterns
3.  The FREE Peppermint Magazine Wide Leg Pants, designed by In The Folds which again are not jeans, but I made the upper part fitted like jeans, the fit is amazing, and I love them with all my heart! Haha, but seriously, see my last post for more details.

***Time for a giant disclaimer here!! Anything I say in this post about the fit of these patterns is not meant to be a criticism of the patterns. All three are wonderful patterns. They are drafted for different body shapes, not necessarily mine, and isn't it wonderful that there are patterns out there representing so many different shapes? I chose to sew all three pretty much as drafted so I could see what shapes they were designed to fit. ***

I'm also throwing the Calvin Klein pattern and my own self-drafted jeans into the comparison ring. My whole purpose is to see how the Calvin Klein pattern compares to a variety of other patterns so I can tell if it's worth my time to sew them up or not. So... ready to see where the rabbit hole leads?

There are dozens of places where jeans can fit wrong -- waist, hips, thighs, calves, length, rise, angle of legs, dart shaping in yoke, back waist gap... the list could go on. My biggest issue with jeans is the way they fit in the back. Because really, isn't that what we all want from a pair of jeans? a nice looking behind? (Or at least one that isn't obviously bad looking?) And there are a lot of measurements involved in getting this perfect fit:

Rise:  The vertical distance from crotch to waist, without going over or around any curves
Crotch length:  The distance of the crotch curve from front waist to back waist. I prefer this measurement to be divided into front and back crotch length because some people have more distance around the abdomen and some have more around the behind.
Stride: This is a men's term, but I don't know why women don't use it, or at least some variation. It's the distance from the crotch point, under the bum, and diagonally up to the intersection of the side seam and waist. I think it's technically the amount of fabric you need in that area of your pants to take a step.
Hip Circumference:  Usually measured at the widest part of the hip, but that measurement can include the largest part of the abdomen, thighs or behind, or just one or two of the three, and the perfect pattern shape will differ depending on which of those areas needs the extra room.
Hip depth: The distance from the largest part of the hip to the waist, measured against the body. The measurement will be different at center front, side, and center back, depending on where the curviest parts of the body are.
Waist circumference: The distance around the waist.

To complicate matters, knowing all of your measurements still doesn't always help because different pants and jeans have design differences in rise (front and back), side seam placement, and inseam placement. And to complicate things even further, a change to a pattern for one of these measurements will affect the others.

  I tend to get a lot of folds under my bum and the waist pulls down in back when I sit. Fitting books and tutorials address this in different ways. Some say to add length to the back crotch length by extending the "hook" horizontally, some say to slash from center back seam to side seam and add a wedge, and some use a quick method of extending the center back seam higher then blending the back waist back down to the side seam. Some say to "scoop" the back crotch hook more, but only by 1/4" or so. My favorite methods have to do with "body space" and making sure the depth of your body will fit within the curve of the pattern. There are dozens of tutorials online for using a flexible ruler or foil "rope" to duplicate your body space. However, I've never seen one that explains how close to your body to measure the shape. Maybe some do, but I've never seen it. Probably because there is some personal preference involved. Some people like their pants to have an extreme wedgie while some favor the mono-butt look. (Don't know what that is? Google it!) I'm somewhere in between. Jeans and other close fitting pants generally have a higher, tighter crotch because that allows for greater range of motion. Kind of counter-intuitive, I know, but try to imagine walking in a pair of pants with tight legs and a low crotch -- it really wouldn't be comfortable.

Umm, this is my shape - side view, cross section, the heavy black line is my waist. Yup, putting that on the internet for the world to see. And to be honest, this shape doesn't fit many RTW clothes. Good thing I can make my own! I have a short rise, I'm pretty shallow front to back, and the fullest part of my bum is lower than average which makes the lowest part of my body space curve fairly wide. I know this is my most challenging area so I set out to find the back crotch curve shape for my body.

In the interest of research, I traced all 5 patterns mentioned above onto one piece of paper. The Calvin Klein pattern has the crotch line marked on the pattern pieces, perpendicular to the grainline and through the crotch point on both front and back. I marked a crotch line the same way on the other patterns, lined them all up, and here's what I got:


The first thing I noticed is that the angle from the crotch line to the front inseam is basically the same on every pattern. I don't know the significance of that but it's a bit of knowledge that may come in handy someday. Also, I know these aren't the actual crotch lines on the patterns because the distance from crotch line to waist should be the same on the front and back pieces. That makes the whole similar angle thing more perplexing. But that's a rabbit hole for another day.

The second thing I noticed is that there is a lot of difference in the crotch curves. Which brings me to the whole point of this project -- which crotch curves fit me best, and why?

Most tutorials out there will agree that the body space needs to fit within the curve, but they don't agree on how to measure the curve. Some will line the front and back up as above, and some will line up the inseams, which opens up the curve. Some of my patterns have a very sharp angle between crotch and back inseam, so lining up the inseams opens the curves up a ridiculous amount. I finally came across this forum discussion which didn't answer my question, but led me to think the answer lies in lining up the inseams at knee level, not at upper thigh, and observing how much the curve opens up. I measured my patterns' body space width both as arranged above and with the inseams matched at knee level, and while the measurements changed, they kept the same order from smallest to largest body space.

Here is a comparison of the patterns that fit me best:


These are my self-drafted jeans (red), which after 8 versions should fit me pretty well, and the Peppermint Wide Leg Pants (green). I lined up the front crotch curve instead of the crotch point so I could compare a little better, and I think I'm on to something! My self-drafted jeans have the tiniest bit of pull across the front crotch, and I can see that the better-fitting curve of the wide leg pants is the slightest bit flatter in that area. I'm currently wearing the wide leg pants, and I noticed this morning that I scooped the back crotch a little too much, resulting in a bit of mono-butt. Overall I was surprised to see how similar these are, but I guess I shouldn't have been since they both fit really well. Between these two patterns I think I've found the perfect crotch curve for me! 

And now for the patterns that don't fit as well:


The Chi-Town Chinos (blue) have a fairly narrow U-shaped curve that's almost symmetrical front to back. The Morgan Boyfriend Jeans are even narrower with closer to a V shape. I have seen both these patterns on other bodies and they look fantastic, but considering how different they are from my ideal pattern shapes it's pretty easy to see why I don't love the fit on either of these. These shapes make sense with these patterns because the Chi-Towns are drafted as chinos, which should be looser fitting than jeans, and the Morgans are boyfriend jeans, which again are a looser fit. However, both fit me really close in the thighs so for me the crotch needs to fit more closely.

And now to answer the question this whole journey started with: Is the Calvin Klein pattern worth trying?

Red is my self-drafted pattern. Brown is Calvin Klein. I think we have a winner! I'll move the inseam forward, but I think all other alterations can be done while baste-fitting. Now I can put my extra patterns away, get off the computer, and start sewing!


Tuesday, July 3, 2018

Peppermint Wide Leg Pants


Ok, so I never thought I'd wear a pair of wide leg pants. Maybe if I were taller or thinner or younger or hipper, but I was very much convinced they weren't a good match for my body or personality.

Then a couple months ago my family did a marathon shopping trip to celebrate all our grown children's birthdays. I don't buy clothes, I make them, but in the interest of research I decided I better try on some things out of my comfort zone and maybe expand my horizons a little.  I picked up these yellow pants at Madewell, just because I thought it would be funny to try them on.


I took this photo in the dressing room and texted it to my daughter in the next dressing room because I was afraid to walk out in public. The pants were so wide! So yellow!!!  But oh so comfortable. (And a little bit too big, because since I sew all my clothes I don't know my size, haha!) In the end I left the dressing room and faced the ridicule of my family and even a stranger in the store. Yes, they all laughed, but I convinced my daughter to try on a pair and although we walked out of the store empty handed we were both intrigued.

I kept thinking about the yellow pants. Maybe even dreaming about them. I looked at patterns and thought about how dumb it would be to expend any money or energy on a pair of pants that I would never wear. Then I saw the free Peppermint Wide Leg Pants pattern. Did I say free? And there's no shortage of fabric at my house, so with a couple days' effort I could have a free pair of pants. Although I did end up having to buy a zipper -- but still, almost free pants!

For reference, my hips are 40" and I cut a size D which is for 39" hips. I have no idea how I came to that decision, but I ended up taking the hips in by 1.5" in my muslin (an old sheet with absolutely no stretch) and by another 1.5" in the final pants which have the tiniest bit of stretch. I wanted a really snug fit between the waist and hips. 

The Peppermint Wide Leg Pants are drafted for someone 5'7" tall. I'm 5'6" with a long torso and short legs. I shortened the pants 1" between waist and hip so the bottom of the waistband sits at my waist, and I shortened them by another 1" at the hem. They are longer than capri length but cropped enough that it doesn't look like my pants shrank in the wash. I hope.

The proportions of the Madewell pants were all wrong on me. I needed a narrower wide leg. After some experimenting with my muslin I decreased the hem circumference from 26 inches to 22.5 inches. Some of that was taken up along the sideseam when I took in the hips, and the rest was taken from the inseam. I basically made a new inseam parallel to the old one from hem to knee, then curved it up to the original crotch point. 


I also went off-pattern with the pockets. I wanted secret pockets, just big enough to hold my phone. With my muslin pinned skin-tight around my body, I slid my phone underneath, nestled it in the hollow between my abdomen and hip bone, and drew a line around it. I used that line to draft the pockets in the perfect size, shape and position. It didn't occur to me that my hand is bigger than my phone, so if I put money or ID in a pocket I may have to take my pants off to get it out. Haha, lesson learned! 


One more note on this pattern, the fly has instructions for a left-hand opening. I did it backward on purpose since I prefer it this way.

Now that my pants are done, I love them! I may wear them every day for the rest of the summer. And my daughter who also tried on the Madewell pants? She has the Peppermint Wide Leg Pants pattern cut out and ready to go and I shipped some of my extra denim to her.


Puzzle-Piece Pattern

“It’s not the writing part that’s hard. What’s hard is sitting down to write.” -Steven Pressfield, The War of Art I’m c...